Epiq Discover Version 3.9 Release Notes (January 2024)
This release contains updates and improvements to Epiq Discover. The following notes highlight new enhancements to Epiq Discover and provide a list of bugs addressed in this release.
Release Highlights
Release 3.9 contains the following features, as well as additional enhancements listed in this document. The following sections contain details about these features and enhancements.
-
Privilege Detection. The new Privilege Detector feature assists Review teams in identifying Potentially Privileged email documents.
-
Improvements in Bates Number Searches. In projects created in Epiq Discover, release 3.9 or higher, improved how to search for documents based on Bates Numbers by adding the ability to supply wildcards for Bates numbers and to search for Bates number prefixes, suffixes, and ranges. Also, added new production fields, and you can sort the Document List using these fields.
-
Download exports from DataHub. Now, in addition to Desktop Client, you can export documents, images, and productions directly to DataHub. Then, you can download directly from DataHub, without the need to open Desktop Client.
-
Modify Custodian Metadata. In the Modify Document Action, you can now modify the Custodian field.
-
Manage Redaction Labels. In Project Settings, Project Managers can now add to or delete from the redaction labels that appear when manually applying redactions to documents in Review and Inspect.
-
Search Highlight Improvements. Highlight colors set via Project Settings, under Review>Highlight now appear on documents when viewing Native and Image formats.
Enhancements in Release 3.9
This release contains the following enhancements and updates.
Inspect/Review
Jobs page update
Updated the Review and Inspect JOBS page so that you can view the job information for the following jobs. These jobs previously only appeared in Jobs Overview. (419678)
|
Job Name |
Inspect or Review |
|---|---|
|
Conceal |
Review only |
|
Delete |
Both |
|
Entity Identification |
Inspect only |
|
Export |
Both |
|
Folder |
Both |
|
Image |
Both |
|
Modify |
Both |
|
Near Dupe and Threading |
Inspect only |
|
OCR |
Both |
|
PII/PHI Detection |
Inspect only |
|
Production |
Review only |
|
Project reports |
Both |
|
Promote |
Inspect only |
|
Redact |
Review only |
|
Tag |
Both |
|
Transcribe |
Both |
|
Transfer |
Both |
Added new fields in Metadata
In projects created in Epiq Discover, release 3.9 or higher, added the following multiple value production fields. When you produce a document with different bates numbers in different productions, this field reflects those bates numbers. You can sort the Document List using these fields. (786152)
-
Begin Attach
-
Begin Bates
-
End Attach
-
End Bates
Search updates
In projects created in Epiq Discover, release 3.9 or higher, added the following search enhancements to search for the produced documents. (421093)
-
Support wildcard searching on Bates numbers. Now, you can search for produced documents using wildcard search on Bates numbers in the Search box. For example, if the Begin Bates number of a document is VOL00009, then in the Search box, enter Begin_Bates(vol*9) to search for this document.
-
New search options. Added the following fields to enable you to search for produced documents using the bates number range, prefix, or suffix.
-
Attach Prefix
-
Attach Suffix
-
Bates Prefix
-
Bates Range
-
Bates Suffix
-
Download exported documents from DataHub
Previously, documents, images, and productions you exported from Epiq Discover could only be downloaded via Desktop Client. Now, in addition to Desktop Client, you can export documents, images, and productions directly to DataHub. Then, you can download directly from DataHub.
While DataHub enables you to download from Epiq Discover, the following recommendations apply. We recommend using DataHub to download up to 60 GB of data. For data above that maximum, use Desktop Client instead. Similarly, when uploading to DataHub, we recommend uploading no more than 1 GB at a time. When you need to upload data that exceeds that maximum, use Desktop Client instead.
When exporting documents, you can now save the exported documents in DataHub by selecting Download From>DataHub checkbox that appears when you select one of the following actions in Document Actions>Export>Select Export Action.
-
Export Documents
-
Export Production
-
Export Images
The system saves the exported documents in DataHub as a zip file by default. Using DataHub, you can only download one file at a time. This format enables you to download the export as a single, ZIP file from DataHub. If you want to download individual files from an export, you can save the documents as individual files in the export folder; uncheck the Export as Zip checkbox that appears when you select the DataHub checkbox.
When the Export job successfully completes, in the Outgoing folder of the DataHub project folder, the exported documents are available for you to download. (381797, 811941)
-
To download documents, select a document, right-click, and then select Download.
-
You can also delete documents or folders, as you do in the Incoming folder.

Privilege Detection
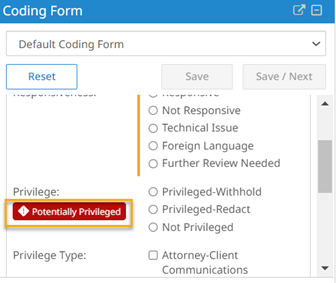
The new Privilege Detector feature assists Review teams in identifying Potentially Privileged email documents. When enabled and documents are promoted, the Privilege Detector automatically analyzes the domain present in the email header against a carefully curated global list of domains, which includes law firms and other privileged entities to determine whether it is Potentially Privileged.
To use this feature in new projects you create, contact the Client Success team to enable Privilege Detector.
You can search for documents using the Privilege Detection. This means you can search, export, load, use it in coding forms, and generate results with it. (791544, 795071)
Promote documents with Privilege Detector
When enabled, Privilege Detection identifies documents as Potentially Privileged automatically when you filter and then promote documents. This feature analyzes the domain present in the email header to determine whether it is Potentially Privileged.
-
To promote documents, refer to Promote filtered documents.
-
To view Privilege Detector job details, refer to View Privilege Detector job details.
View Potentially Privileged tag information
After promoting with Privilege Detector enabled in Review or Inspect, you can view whether the document is potentially privileged.
Perform the following procedure to view a Potentially Privileged tag information.
-
In the Project page, select REVIEW or ANALYZE>INSPECT.
-
Select the document.
-
To view Potentially Privileged document, use one of the following methods.
-
In the Docked Viewer, in the document pane, click
 .
.
-
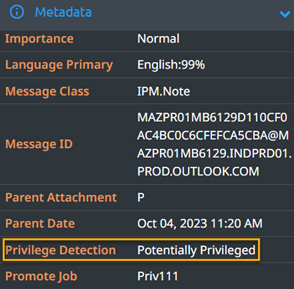
In the Undocked Viewer, in the left pane, select Metadata.
-
Export Potentially Privileged metadata to CSV
After the Privilege Detector job successfully completed, as needed, you can export the document to CSV to check if it is potentially privileged.
-
To export metadata to CSV, refer to Export document metadata.
Added the ability to search for Privilege Detection documents
Now, in Inspect or Review, you can filter the privilege detection documents using the Privilege Detection option.
-
Refer to Search for Privilege Detection in Inspect for more information.
Manual redaction updates
In the Document Viewer, added the following manual redaction enhancements.
-
When you redact a document using a custom reason, this reason will appear in the reasons menu, which you can select for further redactions. (327475)
-
When you use a reason for redaction, the system will use this reason as the default option for further redactions. (327475)
-
You can now make multiple redactions by single-clicking the Redact icon
 in the Toolbox for the Docked or Undocked Viewer or on the bottom of the page for the Docked Viewer. (732790)
Document Viewer: Search highlight improvements
You can now quickly view search highlights in documents when viewing the Native or Image in the Document Viewer. This improvement applies to the Docked Viewer and the Undocked Viewer. Highlights shown include those set via Project Settings(Default, Responsive Color, Privilege Color, and Global). (309937, 773365)
The following list shows how highlights now appear in documents viewed as Native or Image in the Document Viewer. Project Managers set all highlight colors for the project in Project Settings, under Review.
-
Persistent highlights. Existing functionality for Responsive Color, Privilege Color, and Global, shows persistent highlights set for the project when you click the Content Search icon in the Toolbox while viewing Native or Image format.
When you click that icon, persistent highlights appear in the new Content Search pane that appears to the right of the document, shown in the following figure. You can toggle between search terms in the Content Search pane.
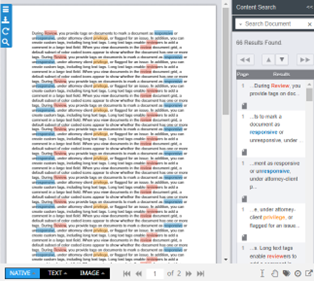
To hide the Content Search pane so you have more room to view the document in the viewer, click <<. To re-open the Content Search pane, click the Content Search icon
 in the Toolbox.
 -
Highlights from Search box. Now, the Default highlight appears when you search for documents by typing a term or phrase in the Search box at the top of the Inspect or Review page and then open a resulting document. You can also supply an asterisk at the beginning or end of a word, but other types of wildcard usage are not supported in highlights. For more information about search highlights, refer to Search highlights.
The color of the default highlight is set in Project Settings>Review>Highlights>Default. In projects created in Epiq Discover, release 3.9 or higher, the default color set for Default highlights is yellow, which was changed from light pink. The Search box appears in the following figure.

To view Search box highlights, in the resulting Document List, select a document so it appears in the Viewer. In the Content Search pane, the term appears as a search, and in the document, the term appears highlighted.
-
Search highlights within a document. Additionally, if you search for terms within a document while displaying it in Native or Image mode, that term will also appear with the Default highlight color.
To do this, click the Content Search icon
in the Toolbox and enter a term in the Content Search pane. Epiq Discover highlights that term using the Default highlight color. In addition, the term you entered appears in the Content Search pane.
Added the ability to modify custodian
You can now modify the custodian name of a document using Document Actions>Modify>Modify Metadata>Create / Update or Replace action. When you update a custodian name, the system updates the custodian name for all the documents in the family and also updates the All Custodian and All Custodian Path fields. (324354)
Production
Download production from DataHub
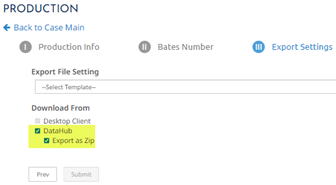
Added the ability to download production from DataHub. When creating production, you can now save the production in DataHub by selecting the DataHub checkbox under Export Settings>Download From. The system saves the production in DataHub as a zip file by default. (If you want to download individual files from a production, you can save the documents as individual files in the production folder; uncheck the Export as Zip checkbox that appears when you select the DataHub checkbox.)
When the Production job successfully completes, in the Outgoing folder of the DataHub project folder, the production is available for you to download. (381797)
Administration
DataHub Updates
Added DataHub to project
Added Datahub to Home page> , where you can view the Outgoing and Incoming folders of the project. To access DataHub within a project, in the Home page, click and then select DATAHUB. (816712)
In the project page DataHub, Review Managers or higher roles can perform the following actions.
-
In the Outgoing folder, you can download exported or produced documents if you save the documents to DataHub during production or export.
-
In the Incoming folder, you can upload and download documents, as well as add, rename, or delete folders.
Added the ability to zip files
In the Incoming and Outgoing folders, you can now zip documents. (770264)
To zip the documents, perform the following procedure.
-
To select multiple documents in a folder, select a document, then hold Ctrl while selecting additional documents.
-
Right-click and then select Zip.
-
In the Zip Files dialogue box, click Zip. The system creates a zip file with the name of the first document in the selected document list. You can rename this zip file.
Added the ability to add or delete redaction labels
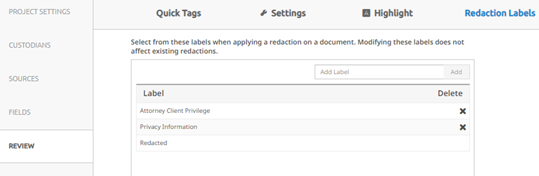
In Project Settings, Project Managers can now add or delete redaction labels used when manually applying a redaction on a document in Inspect or Review. When you add a redaction label in the Project Settings, the same label appears in the Reasons menu when manually redacting a document in Inspect or Review. The deletion of a redaction label does not affect existing redactions. (728093)
When you create a project, the following labels are available by default:
-
Attorney Client Privilege
-
Privacy Information
-
Redacted. You cannot delete this label.
The following figure shows the default Redaction Labels settings.
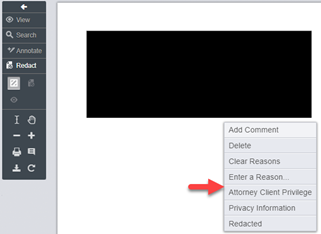
The following figure shows the Reasons menu that appears when redacting an image file in Inspect or Review.
When creating a new project, you can copy the redaction label settings from an existing project.
To manage redaction labels, perform the following procedure.
-
In the Home page, click
and then select PROJECT SETTINGS. -
In the left pane, click REVIEW.
-
Select Redaction Labels.
-
Update the redaction labels as needed.
-
To create a label, add a label in the text box and then click Add.
-
To delete a label, perform the following steps.
-
Click
 on a label.
 -
Click Save.
-
-
Document list setting update
Now, you no longer need to limit the initial amount of documents to display in the Document List because of the improved Document List loading and pagination performance. Therefore, we removed the Initial Amount of Documents to Display option from >PROJECT SETTINGS>Document List Settings. (751647)
Bugs fixed in Release 3.9
The following bugs were resolved in this version.
|
Number |
Title |
|---|---|
|
780758 |
Processing | Culture ID: 15369 is not a supported culture for msg files |
|
786797 |
Project Settings | Data overview is shown blank when custom source and documents associated is deleted. |
|
792948 |
Inspect / Review | Search ignores characters prior to a space in Custodian last name |
|
795235 |
Bulk Delete | Deletion job was not completing fully |
|
799193 |
Folder | Loading jobs causing API out of memory |
|
804370 |
Entity Identification | Entity Job getting timed out |
|
806141 |
Coding Forms | FieldID does not always line up |
|
810640 |
Doc Actions | Folder by Metadata - Filepath | Submitting a 10k job results in multiple opensearch errors |
|
812187 |
Processing | Document StateID for NIST files are captured incorrectly |
|
813227 |
Fields | Create Field |"FieldType" in "Select FieldType" is missing a space |
|
816765 |
MHT files | Native viewer displays HTML code instead of email |
|
817275 |
Image | Image of mail that contains tables inside is cut off |
|
819296 |
Email Threading | Inclusive emails not identified correctly |
|
821528 |
Autoload to Relativity: Job failed with error "Timeout has occurred retrieving document metadata." |
|
822525 |
Custodian Creation | Project Settings | When custodians with similar names and with a space between characters in the first name is modified, we are allowed to save changes, causing duplicative custodian values to appear in the custodian list |
|
822697 |
Project Field | Able to create deleted field |
|
825585 |
Autoload to Relativity: Retrying transfer job blocking other transfer job |
|
829161 |
Promotion | Job completed but not all documents are promoted (to track the promotion issue) |
|
830739 |
Document List | Document List not refreshing after time-out |
|
831469 |
Promotion | Job Popup - Document promoted and documents already promoted count is same |
|
832375 |
Project Settings | Error reported when starting to restore an archived project |