Epiq Discover Version 4.3 Release Notes (August 2025)
This release contains updates and improvements to Epiq Discover. The following notes highlight new enhancements to Epiq Discover and provide a list of bugs addressed in this release. All new features and enhancements are available to you when using our New interface. To view new functionality, make sure you set the Toggle at the top of the page to New instead of Classic.
Release Highlights
Release 4.3 contains the following features, as well as additional enhancements listed in this document. The following sections contain details about these features and enhancements.
-
Saved Search. Users can easily organize and manage saved searches using search folders in Inspect and Review. Additionally, they can perform nested searches, including family documents, and use saved searches across modules such as OCR, Images, Production, Reports, and Assignments.
-
Chat update. Added the ability to view documents that the system referenced to generate a chat response. You can view these documents in the Document List.
-
Label documents. You can use the new Data Label field to assign a custom label for documents to classify them, such as an Evidence ID or Media ID. You can bulk assign a data label in Inspect or Review or when collecting files in Desktop Client.
-
Transfer to Relativity. Users can track attachments more effectively with the new Child Documents toggle in the Transfer to Relativity page. When enabled, it generates an Attach ID field and displays all related attachment document IDs within the parent record.
-
Reviewer tracking enhancement. Added new fields to track when documents are initially coded and most recently coded. These fields show the reviewer’s name and the time of review when the reviewer tags a document using the tracking field specified in the project settings. This enhancement supports better visibility into reviewer coding activity and helps users assess productivity.
Enhancements in Release 4.3
This release contains the following enhancements and updates.
Process
Support of Microsoft OneNote
The system now supports the collection and processing of Microsoft OneNote files. In the Project Settings, you can enable or disable the extraction of pages from .onepkg files or OneNote files containing multiple pages. By default, this feature is disabled for existing projects and enabled for new projects. (962698, 988653)
To enable or disable the extraction of OneNote pages, perform the following procedure.
-
In the Account Menu, select Project Settings.
-
In the left pane, click Processing.
-
In General, select the Extract Pages from OneNote Archives checkbox to enable the feature or uncheck it to disable the feature.
-
Click Save.
Page extraction behavior
When you process OneNote files with page extraction disabled in the project settings, the system extracts only the attachments within pages and processes the other files as Excluded Archive.
When you process OneNote files with page extraction enabled in the project settings, the system extracts the OneNote pages as individual documents and processes the contents within pages as follows.
|
Content within a page |
Extraction behavior |
|---|---|
|
Attachments or embedded objects |
Processes as child documents. |
|
Images on page |
Processes as child documents. |
|
Emails and their attachments |
Processes as child documents. |
|
.onepkg on page |
Processes the .onepkg file as Excluded Extensions. Excludes the section and processes the pages within it as child documents. |
|
Section on page |
Processes a section with multiple pages as Excluded Archive. Processes the pages within that section as child documents. Processes a section with a single page as a child document. |
Metadata fields for Microsoft OneNote files
The system populates the following fields for Microsoft OneNote files.
|
Field name |
Description |
New field |
|---|---|---|
|
OneNote Original Name |
For a OneNote file containing multiple pages, this field displays the section name suffixed with .one. |
Yes |
|
OneNote Group ID |
Parent document number. |
Yes |
|
OneNote Section |
Section name within the OneNote file. |
Yes |
|
File Name |
Name of the OneNote page. |
NO |
|
Epiq Discover Application Type |
For a .onepkg file, this field displays Microsoft OneNote Package, and for a .one file, it displays Microsoft OneNote. |
NO |
|
Extracted Text |
Full text of Microsoft OneNote file. |
NO |
|
File Type |
For a .onepkg file, this field displays Microsoft OneNote Package, and for a .one file, it displays Microsoft OneNote. |
NO |
|
File Type Category |
For a .onepkg file, this field displays Archive/Compressed, and for a .one file, it displays Document. |
NO |
Special cases
For OneNote section files with a single page with no attachments, the system does not populate the following fields.
-
OneNote Original Name
-
OneNote Group ID
-
OneNote Section
The system processes OneNote section files with multiple pages or no pages as Excluded Extensions.
File Hash value
For OneNote files, the system assigns the same File Hash value if the following conditions are met.
-
They contain the same text content.
-
They have the same Author.
-
They include identical embedded images.
-
They contain the same attachments.
Metadata updates
The system now automatically populates the following metadata fields during processing. (957865, 957776, 957775)
|
Field Name |
Description |
|---|---|
|
Domain To |
Domains of the recipients listed in the To field of emails. |
|
Domain CC |
Domains of the recipients listed in the CC field of emails. |
|
Domain BCC |
Domains of the recipients listed in the BCC field of emails. |
|
Email Category |
Identifies the category of EML and MSG emails, such as Social, Marketing, or Promotions. |
|
Entry ID |
Unique identifier for files extracted from OST or PST containers. |
|
MIME Type |
Indicates the content type of a file. For example, it displays text/plain for plain text files and text/html for text files containing HTML content. |
The system populates the MIME Type field only when you enable MIME (Multipurpose Internet Mail Extensions) type extraction in the Project Settings. To do so, perform the following procedure.
-
In the Account Menu, select Project Settings.
-
In the left pane, click Processing.
-
In Processing>General, select the Enable MIME Type Extraction checkbox.
-
Click Save.
You can perform the following actions using the above fields.
-
Search for documents using the Search Builder.
-
Export metadata to CSV.
-
Filter documents.
-
Map fields when transferring documents to Relativity.
-
When creating production, you can include these fields for produced documents, sort the documents, and brand the image files.
-
Remove the fields using Document Actions>Modify Metadata.
Also, you can create or update the Email Category field using Document Actions>Modify Metadata.
Inspect/Review
Added the ability to label documents
You can now label documents. To support this functionality, added the following data label fields.
|
Field Name |
Description |
|---|---|
|
Data Label |
Displays the label you assigned. |
|
All Data Label |
If the exact duplicates of a file have been assigned different labels, this field displays all those labels. When you delete a duplicate document, the label assigned to that document is removed from this field. |
After selecting the documents to label, you can assign or update a data label using the Data Label field through Document Action>Modify Metadata action. Also, the system populates the data label fields if you label documents during file collection in Desktop Client. Refer to the Desktop Client section for more information. For a document family, if you create or update the Data Label for a parent or child document, the system creates or updates this field for all documents in the family.
You can perform the following actions using the Data Label and All Data Label fields.
-
Search for documents using the Search Builder.
-
Export metadata to CSV.
-
Map fields when transferring documents to Relativity.
-
When creating production, you can include these fields for produced documents and brand the image files. Also, you can use the Data Label field to sort the documents.
(951422, 951425, 787453, 951420, 951421, 951424, 951426, 951423, 967187)
Added the ability to organize Saved Searches
To streamline search management, added the ability to organize Saved Searches and use them within Search Builder. In Inspect and Review, Saved Searches now appear in the Saved Search pane. Within this pane, you can create search folders to group related Saved Searches. Clicking a Saved search runs the Saved Search and displays the list of documents matching the search criteria.
Saved Searches and search folders appear in numeric order first, followed by alphabetical order. For example, a folder named 1004corp appears above a folder named Alphacorp. You can drag and drop Saved Searches into the search folders. You can also nest Saved Searches under subfolders within a folder. This feature allows flexible and hierarchical organization of Saved Searches. Any search folders you add in Inspect also appear in Review, and vice versa.
The image below shows the Saved Search pane.
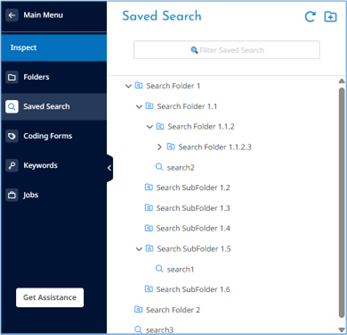
Saved searches display with the  icon and search folders display with the
  icon. (934889, 935874, 955376, 965045)
-
To view saved search organization, refer to View saved search organization in Inspect.
-
To add a saved search folder, refer to Add a saved search folder in Inspect.
-
To organize saved searches, refer to Organize saved searches in Inspect.
-
To modify a saved search or search folder, refer to Modify a saved search in Inspect.
-
To delete saved searches and folders, refer to Delete saved searches and folders in Inspect.
Added the ability to perform nested searches
In Search Builder, added a new field named Saved Search. Using this field, you can create and run nested searches within Search Builder by referencing existing Saved Searches. Currently, you can nest saved searches up to five levels deep.
You can use Saved Searches across applicable areas, such as OCR, Images, Production, Reports, and Assignments. (974644)
Transfer to Relativity update
Append All Data Label field in Relativity
In Transfer page>Field Options, renamed the Append All Custodian Fields toggle to Append Fields. In addition to appending data to the ALL CUSTODIAN and ALL CUSTODIAN PATH fields when a previously transferred document is found with a different custodian name, enabling the toggle now also appends data to the All Data Label field in Relativity if the document is found with a different data label. (967187)
Added the ability to track attachments
In Inspect and Review, added a new Field Option named Child Documents in the Transfer page. This option allows you to generate and include an Attach ID field that identifies, and tracks attachments linked to parent documents, such as emails. When enabled, this field displays all related attachment document IDs within the parent record.
To use this feature, navigate to the Transfer page and in Field Options, enable the Child Documents toggle. (957774)
OCR update
In Project Settings>Processing, in the OCR PDF files only when Extracted Text is equal to or less than field, you can now specify the extracted text size in bytes. (957358)
Reviewer tracking enhancements
You can now track reviewer activity using the following new fields:
|
Field Name |
Description |
|---|---|
|
Reviewed On |
Date and time of the initial review. |
|
Reviewed By |
Name of the reviewer who initially reviewed the document. |
|
Last Reviewed On |
Date and time of the most recent review. |
|
Last Reviewed By |
Name of the most recent reviewer. |
The system populates these fields when a reviewer tags the document using the specified tracking field. By default, this feature is disabled. You can enable or disable it in Project Settings. When enabling the feature, you can also specify which field to track.
Once a document is coded, the Reviewed On and Reviewed By fields remain visible and unchanged, even if you disable the feature. Changing the field to track in Project Settings does not update the Last Reviewed On and Last Reviewed By fields unless you re-code the document using the new field. You can remove all reviewer tracking fields using Document Actions>Modify>Modify Metadata. To specify a field to track, perform the following procedure.
-
In the Account Menu, select Project Settings.
-
In the left pane, click Review.
-
In Coding, set the Enable Reviewer Tracking toggle to right.
-
In Field to Track, select a field.
-
This field lists only Single Choice, Multiple Choice, Boolean, and Date field types.
-
-
Click Save.
You can also perform the following actions using the new fields.
-
Search for documents
-
Export to CSV
-
Brand images and sort the documents when creating a production
(309855, 948436, 962965, 945665, 962905, 962967, 976780)
Chat updates
View all referenced documents
Added the ability to view all documents that the system referenced to generate a chat response. To do so, perform the following procedure. (958999, 940720, 978693)
-
In the Main Menu, select Review and then Chat.
-
In a chat response, click
 . The referenced documents appear in the Document List, where you can view them.
Add third-party data to AI model
If the Extracted Text Size is 0, particularly for third-party data loaded using Desktop Client, the system does not add documents to AI Model. To include such documents, manually set the Extracted Text Size to a value greater than 0 using Document Actions> Modify> Modify Metadata.
Administration
Persistent highlights update
When setting the persistent highlights, you can now upload terms in bulk using a CSV or TXT file. To do so, perform the following procedure. (914890)
-
1. Create a CSV or TXT file containing the terms you want to highlight.
-
Include one term per row or line. Do not add any headings.
-
In the Highlights settings, each of the following fields supports up to 100 terms.
-
Responsive Color
-
Privilege Color
-
Each group under Global
-
-
The system skips duplicate and incorrectly formatted terms.
-
-
In the Account Menu, select Project Settings.
-
In the left pane, click Review.
-
Select Highlights.
-
To bulk add terms in Responsive Color, Privilege Color, or a group under Global, click the Bulk Add Terms icon
 next to the respective field.
 -
In the Bulk Add Highlight Terms dialog box, do the following steps.
-
In File, navigate to the CSV or TXT file you created.
-
Select the file and click Open.
-
Click Upload.
-
The system automatically saves all bulk added terms, whereas you must save the manually entered terms.
-
-
Audit History Report updates
Added a Value Selected column to the Audit History Report by User and Audit History Report by Document. This column shows the selected value when performing the following actions on Single Choice, Multiple Choice, and Boolean fields.
-
Bulk Tag>Append, Remove, or Replace All
-
Quick Tag
-
Propagate
When you append a value that already exists in the field using the Bulk Tag action, the column displays Duplicate Value Selected. (958996, 951082)
Desktop Client
Added the ability to label documents
You can now label the documents when collecting local files through Action page>LOCAL. To support this functionality, We added the new field: Data Label. The following image shows the Data Label field. (951422, 951425, 787453, 951420, 951421, 951424)
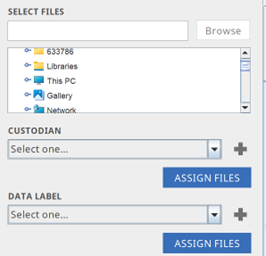
To assign a label, do the following steps.
-
After selecting the files, in DATA LABEL, select a data label from the list or add a new data label using the following substeps.
-
Click + next to DATA LABEL.
-
In the ADD NEW DATA LABEL dialog box, type the label and click CREATE.
-
Click ASSIGN FILES to assign the label.
-
The following data label indicators display in the SELECT FILES box.
-
The label name appears next to assigned files.
-
The label name appears next to folders where all files in the folder are assigned with a specific label.
-
Partial appears next to folders where one or more of the files in the folders are not assigned with a label name.
-
Multiple appears next to folders where all files are assigned with more than one label.
-
Optional. In the SELECT FILES box, you can remove a label by clicking the Delete icon
 that appears next to a label.
Bugs fixed in Release 4.3
The following bugs were resolved in this version.
|
Number |
Title |
|---|---|
|
914740 |
Highlight | Resulted in HTML being displayed when empty Group(s) exist |
|
977536 |
Export | Image file count does not match in OPT when document has combination of TIFF + JPG images |
|
945946 |
Filter | Filter job completed with errors but does not move the promotion job to 'Cancelled'. |
|
947206 |
Produce | Resolved an issue that caused timeouts when generating productions for documents containing a high volume of redactions. |
|
959716 |
React | Document List | Review | Improved performance by caching up to 10,000 documents, enabling seamless paging across selected documents without any issues. |
|
966773 |
React | Review | Undocked Viewer | Coding Forms | When a user manually selects a document down the Document List and then saves a coding form update, they are returned to the top of the list. |
|
967593 |
Inspect/Review | Document History | Fixed an issue where the system recorded annotation actions in documents as redactions in Document History. |
|
968330 |
Coding Forms | Default Coding Form is created using an Import Project |
|
968347 |
Produce | Production Template | The system now automatically selects newly created templates, including those created using Save As, in Production Settings. |
| 970720 |
Desktop Client | When collecting files, the Job Finished pop up now shows the following information.
Also, the log file now shows the files that the system fails to collect. |
|
970827 |
Report | User Login History Report job adds future dates to the report. |
|
973697 |
Epiq Internal Feedback | "Saved Search" field does not bring in family, even when ‘Include Family’ is checked in the Saved Search |
|
973741 |
React | Filter | Cannot load same keyword term file when moving to a different filter template |
|
974117 |
When you perform quick tagging with propagation enabled, Document History no longer displays propagation information for quick tags that you apply manually or when there is no change in the field value. |
|
974223 |
React | Prizm doc viewer | Docked/Undocked | Content Search | When navigating to the folder and opening the document, an error appears in the content search, which should not happen |
|
974697 |
React | In Inspect and Review, you can now use keyboard shortcuts to streamline document review. Using these keys, you can navigate between documents in both docked and undocked viewers.
This functionality works across Native, Text, and Image viewers. |
|
976847 |
React | Filter | missing error toast message when same filter template name is used to save a new filter template, getting 400 error in console |
|
977602 |
Angular and React | Search | Searches on renamed fields containing special characters do not return results |
|
977797 |
React | The Document Action panel is missing after page navigation and deselection |
|
978522 |
React | Job submission progress not updating in real-time for individual jobs |
|
978600 |
Search | Searches on old fields for a certain time period containing hyphens (-) do not return DGN |
|
980232 |
Production | Unable to submit production as Review Manager with DataHub option checked - Permission denied is shown |
|
980704 |
React | Image | Slipsheet image fail to load for all loaded images movie as a native (or at least an MP4) |
|
981013 |
Epiq User Feedback | React UI | Production | Folder Population Selection | Dropdown does not display values quickly & no visual indicator of retrieval of values |